The other day I was looking for something in the cellar and I found one of the things I hate most in the world. No, no a mouse, thankfully, although I am not too fond of them either. No, I am talking about wasted food. What I found was a whole basket of potatoes, soft and spidery-looking. Somehow they had got overlooked and never eaten.
I hate to throw out food and, as I examined them to see if any could be rescued and eaten, I suddenly remembered potato stamping. Crafting to use up rotten food – perfect! Basket in hand, I trotted back up the cellar stairs to the kitchen and began to root out everything we would need. By the time the boys came out of the livingroom looking for entertainment, I had everything set up.
We spent a happy hour or so messing about with paints and potatoes, making patterns and Easter pictures, the older two delighted to be allowed use knives, Number Three delighted to be allowed near paint.
I can absolutely recommend potato stamping for all ages. Our stamps worked out really well. So well in fact that we passed them on to our neighbour the next day. She and her 2 and 3 year old had a fab afternoon of stamping pictures too.
If you fancy giving potato stamping a go, here’s what you will need:
Potatoes
A small, reasonably sharp knive or a scalpel
A chopstick (optional)
Paints
Paintbrushes (one per child)
A container of water to rinse the brushes in
Paper and / or card
A black felt tip pen, for drawing features
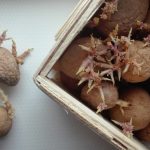
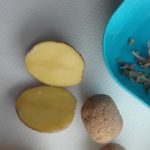

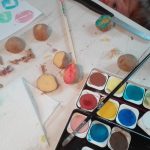
Step 1: Prepare the potatoes by removng any growths and cutting the potatoes in half. We were going for an Easter theme, so we cut the potatoes lengthways for the eggs and width-ways for circles like the bunny’s head and ears.
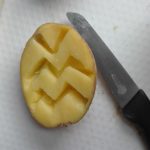
Step 2: Carve your pattern into the cut side of the potato. We cut zig-zag patterns across the width of one potato. For a spotty pattern, we poked a chopstick into one potato to make holes which would become the spots. For grass, we cut an uneven, tight zig-zag onto one of the potato halves.
Step 3: Use your paint and paintbrush to cover the surface of the potato and then stamp it onto a piece of paper, pressing the potato down quite firmly. Lift it up and you should see a lovely patterned egg on your page.

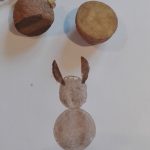
Step 4: To stamp an Easter Bunny, all you need to do is take a large and a small potato. Cut each in half width-ways so that you have two circles. Paint both brown. Stamp the larger one on your page and then stamp the smaller one above it. Now you have a snowman-type figure in brown.
For the ears, lay a narrow strip of paper across the centre of the small potato. Paint the potato on either side of it brown and stamp in on top of the bunny’s head. When you lift it up, you should see the two long, bunny ears.
Use the felt tip pen to draw eyes, a nose and a fluffy bunny tail.
Do give it a go. It is such a fun craft and suitable for all ages, and I swear it is not as messy as you might think.


This post is linked up with Twinkly Tuesday over at Mummascribbles.com
Such a cute idea! I would love to see your content at Top-Notch Tuesday Link-Up: http://www.simplyknowledgehomeschool.com/top-notch-tuesday-link-up-party-2/
Oh, lovely, thanks. I’ll pop over for a look shortly.
What a lovely idea, will be giving it a go! #twinklytuesday xx
Do. It really is a lot of fun, and quite simple.
Great idea – so cute! Not tried potato printing here yet, but remember doing it as a child! #twinklytuesday
It is good fun and the results are bright and bold. They don’t have to be great works of art.
Thanks for popping by.